| FlexFolder setup in Management Studio |
The eDOCS Management Studio has been updated to include two new features when configuring FlexFolders.
Configure Subscription node:
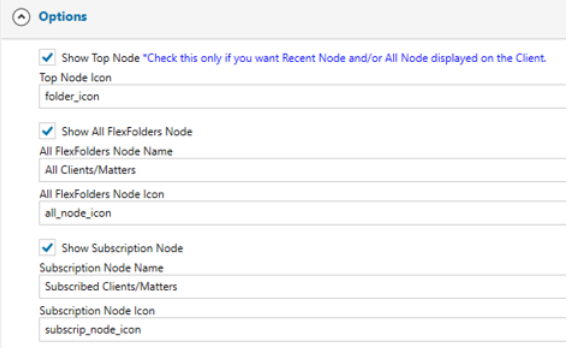
When editing an existing FlexFolder or creating a new one, the administrator will see a new “Show Subscription Node” in the options section.
The administrator can set the name to match the type of subscription for their FlexFolders and define the icon to use

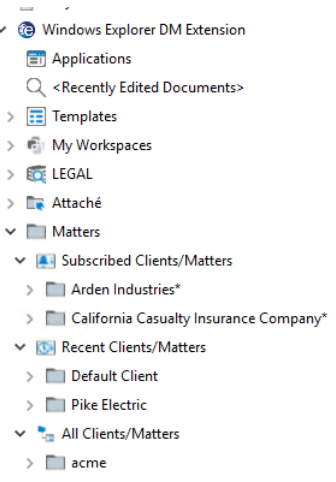
The user will see the new node and the list of FlexFolders that they have subscribed to in the DM interfaces.

Configure FlexFolder permissions:
The administrator will be able to set which permissions a user or group has for the FlexFolder that will control the actions the user or group can perform when accessing the FlexFolder.
They will be able to set the following permissions:
• Can see the FlexFolder
• Can edit the FlexFolder
• Can see the subscribed FlexFolder node
• Can see the recent FlexFolder node
• Can see the “All” FlexFolder node
• Can subscribe to the FlexFolder
• Can set security against a Folder (node) in this FlexFolder, for inheritance purposes when creating items under the FlexFolder
• Can add/create folders at levels where defined as supporting adhoc foldering

|
| Modern Authentication per client |
The modern authentication feature has more granular configuration options where it can be enabled individually for InfoCenter, the DM Extensions or both within the eDOCS Management Studio.
The Client Authentication configuration section has been changed to offer 3 configuration options.
-
DM Extensions: Will enable the Modern Authentication for the DM Extensions for Windows desktop clients when this checkbox is selected.
-
InfoCenter: Will enable the Modern Authentication for the InfoCenter Web, InfoCenter for Outlook, InfoCenter for Office, InfoCenter Desktop and Mobile clients when this checkbox is selected.
-
Default: Will use Modern Authentication when the configuration settings are set for all clients that support the Modern Authentication feature. The DM Extensions 16.7.2 or prior clients do not support Modern Authentication and users of those clients will be prompted to sign in with a username and password.
|
| Manage document types in InfoCenter Web |
The management of Document types is now available in the InfoCenter Web administrator interface for members of groups that have the “Manage Validation Tables” permission.
|
| Configure default InfoCenter tiles |
The administrators will be able to configure the default tiles that are presented to a user based on their primary group.
In the 23.2 release we introduced access to the validation tables in the InfoCenter interface for groups that have the manage validation tables permission.
In this 23.4 release we have added a new tab that will allow the DOCS_Supervisors to configure which tiles are enabled by default for the respective users primary group.
The administrator will be able to perform the following actions:
-
Disable a tile for a group
-
Enable a tile for a group
-
Allow the user to override the administrative setting
-
Set these options for the Default and Additional tiles
-
User will still be able to create their personal tiles and have control over their display on the home page
When a DOCS_Supervisor logs into the InfoCenter web interface and they access the “Home tiles” tab, they will be able to change the default configuration where all the options are enabled for the Default tiles and set to “User can override” for the additional tiles.
The following screen capture shows an example of the multiple configuration options:
-
The Welcome, Favorites, Recently Edited, Saved Searches and Workspace tiles are on by default and the user can turn off – remove one of these tiles from the Home page by deselecting the tile in their user preferences.
-
The FlexFolders tile is set to on, and the user will not be able to remove it from their Home page
-
The Public Folders tile is off by default and the user will not be able to add the Public Folders tile to their Home page.
-
All the Additional tiles are off by default and the user will be able to add them to their Home page.
In the above screen capture the DOCS_Supervisor disabled the Public Folders tile and enabled the FlexFolders node and removed the option for the user to override and disable the FlexFolders tile. When a user of the DOCS_Users goes to their preferences they will see the FlexFolders and Public Folders check boxes greyed out where they can’t change those tiles.
The configuration settings are stored in the DM database DOCSADM.SETTINGS table for the respective group.
The new value is “GroupTileSettings” that is listed in the Name column.
The ENTITY_LINK column contains the SYSTEM_ID for the respective group and the configured tile information is stored in the SETTING column

|
| Disable InfoCenter footer |
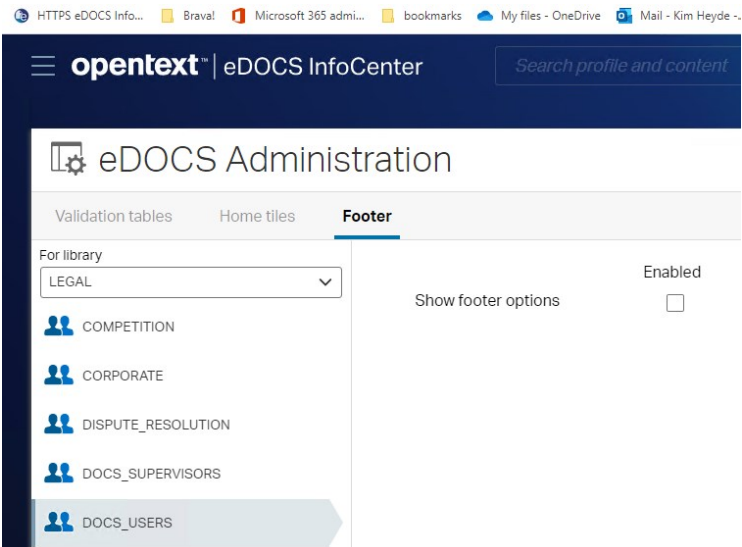
The administrator will be able to enable the prompt to insert a Footer when the user is making a save with the InfoCenter for Office client.
The insert Footer prompt is ON by default for all groups and a member of the DOCS_SUPERVISORS group can disable the feature for individual groups.

With this feature disabled the end user will no longer see the dialog where they select the footer options to insert to the document where they have to select cancel or ok and insert metadata into the footer to proceed with the save operation.
|
| Enhanced email save options |
The InfoCenter for Outlook client has been enhanced to allow the user to save an email “Message and attachments separately” and a new “Save the attachments only” action that can be performed when selecting an email with attachments in Microsoft Outlook
Message and attachments separately:
When selecting an email in Microsoft Outlook the InfoCenter panel will change and present the user will the email save options.
The default is to save the message with the attachments and the user can select the down arrow to see the additional options.
They will see the new option to save the “Message and attachments separately”.
After making the selection they will see a new drop down and when they select the down arrow a list of the email and the attachments will be displayed.
By default, the email, and all the attachments will be selected for the save action.
The user can then decide if they want to only save some attachments, all of them, or deselect the email because they only wanted to save the attachments.
They will then need to complete the profile metadata to complete the save operation.
The save action will perform the following actions:
-
The email will be saved with the attachments, this is done for compliance reasons where the original email and its content are saved as one. This is equivalent to using the “Prevent message modification” in the DM Extensions for Outlook.
-
The selected attachments will be profiled separately.
-
The attachments that were saved separately will be individually related to the original email.
-
The email will be related to all the attachments that were saved separately.
Save Attachments Only:
The user may only want to save the attachments in the email.
Selecting the Save Attachments Only will show the user the list of attachments where they are all selected by default, and they will be able to deselect the attachments they do not want to save.
|
| Limited support for the New Outlook interface |
The InfoCenter for Outlook client has limited support with the New Outlook interface.
Users can save emails and their attachments with the New Outlook interface and the InfoCenter for Outlook client.
Note: The InfoCenter for Outlook client does not currently support attaching documents from eDOCS when creating an email.
The Microsoft Getting started with the new Outlook for Windows - Microsoft Support overview of the features in the new interface makes references to not supporting COM Add-ins at the end of the list which is why the DM Extensions for Outlook is not available in the New Outlook interface.
|
| Import folder structures and content |
This new feature is implemented in the InfoCenter web interface where a user will be able to drag and drop a local folder structure or select the new “Upload folders” action when in the Recently Edited Tile or in an existing folder or workspace and the selected local folder structure will be created in eDOCS with the contents of the folders created in the new folders in eDOCS folders.
From the Recently Edited tile or a Folder or Workspace tile, when they select the + sign they will see a new “Upload folders” action.
This feature requires the user to have the “Can Create Folders” permission for their primary group, if they do not have that permission, they will not see the “Upload folders” action.
The user will be informed about the number of folders and documents that are in the folder structure they selected when the profile form is presented.

After they complete the profile form for the Folders, they will be prompted to fill in the profile form for the documents and can select apply to all for the metadata or be prompted to fill in the metadata for each individual document.
The user will be informed of the progress of the import during the bulk process.

When the bulk import is complete the user will be notified about the number of folders and documents created.
Note: When the user selects the local folder to upload, they will be prompted to allow the InfoCenter web site access to the local folder and files.
Selecting View files is required to import the content.
|
| Export folder structures and content |
This new feature is implemented in the InfoCenter web interface where the user can select an eDOCS folder and the “Export” action will export its content and perform the following actions:
-
Will create a .ZIP file with the name of the selected folder in the browsers downloads folder location.
-
Will create the same folder structure in the .ZIP file if there are multiple sub-folders in the folder that was selected.
-
Will include the documents in the respective folder location in the .ZIP file
-
Will generate a manifest.html in the root folder of the ZIP file with the DM metadata of the content that was exported.
-
Will create an “Errors and Warnings” TXT file if there were issues.
-
A new activity “Export with content” is added to the exported folders and documents history. This is a new value of 118 in the docsadm.activitylog table for all the exported items
-
All users will be allowed to perform the action.
-
Only documents (D) and emails (E) will be exported.
-
Current version of the document will be exported.
-
Document attachments will not be exported.
-
Duplicate names in the same container will have a copy number appended ( abc.txt -> abc (1).txt)
-
Only folders (F) and workspaces (W) will be exported.
-
Containers will only be processed once to minimize the size of the zip as well as preventing circular references ( A-> B-> A-> B->...)
When the user selects a folder, they will see a new “Export” action in the menu bar.

Selecting Export will create a ZIP file with the selected folder name and replicate the folder structure and content in the ZIP file.
The ZIP will include a manifest.html file that includes the DM metadata for the items within the folder.
In DM you may have multiple documents with the same name in a folder and the export will append a (number) to the end of the additional instance of the same document name.
The following screen capture shows a (1) at the end of the second instance of the “eDOCS CE 23.4 Release notes” document.
The zip file might also include an “Errors and Warning.TXT” file if issues were encountered.
In the scenario where there is a duplicate file name, the TXT file will include a warning.
If the folder contained a paper profiled document, it will include a warning that a paper profile cannot be exported.
The error indicates a document in the folder that the user only had view profile rights to, and the document could not be exported because the user did not have rights to the file.
When reviewing the history for the exported folder and its content, there will be a “Export with content” activity.
By default, there is a limit of 5 sub folder levels for the Copy Tree and Export Folder features. This value can be increased for your organization if you use folder structures with more sub levels.
|
| Email with Corporate contact list |
When the user selects the Email action for an eDOCS item and the InfoCenter configuration is setup to use the Microsoft Graph API for Outlook the user will be able to select which address book to use to select the email recipients.
The user might be sending an email to a group within the organization, and they will be able to select the “All Groups” address book.
The user might want to include individual recipients as part of the email and will be able to select the “All Users” address book.
|
| Show Attachments tab |
When selecting the properties for a document the user will see an “Attachments” tab where they can attach files to the selected document.
This feature can be disabled in your environment and the user will no longer see the attachments tab.
|
| Double click support in InfoCenter Office clients |
When working in a lookup table on a profile form in the InfoCenter for Office or InfoCenter for Outlook client the user will be able to double-click a metadata value to add the value to the profile form.
In previous versions the user would select the metadata value and “Add” to use the value.
|
| Modern Authentication redirect Sign-in |
The Modern Authentication feature for InfoCenter can be configured to use a redirect for the login instead of a pop-up dialog when the user accesses the InfoCenter application and is required to login.
|
| Enhanced REST API logging |
New information logging features to help your eDOCS administrators monitor the RESTAPI performance. The eDOCS 23.3 REST API was enhanced to provide additional environment information relating to performance, configuration, logging, and resetting of configuration settings based on the role a user has in the environment.
The logged information was previously held in memory for that release and this information is now stored in a date stamped log file for current review or review of previous logged information.
The log file is located in the C:\Program Files\Open Text\eDOCS REST API Server\edocs\log directory with a file naming convention of Date – Time – Info.log based on the time and date when the REST API was started.
Stopping and Starting the REST API will generate a new log file.
The REST API log file has also been renamed to the new format.
The log file directory will show the new file naming formats and the old naming format for previous log files.
|


